How to Unhide a Folder on Windows 7
 This article shows you how to see hiddeen files and folders in Windows 7. Windows 7 hides important system files so that normally, you do not see them while exploring your computer.
The reason behind hiding these files is that users could inadvertently tamper with them or even delete those causing Windows 7 operations to falter. However, malicious software programs take advantage of this feature to create hidden files or folders and cause disruptions in the computer's operations without the user being able to detect them.
Therefore, being able to see hidden files or folders has its advantages and helps in repairing damages caused by unwanted hidden files. You can change the behavior of your Windows 7 computer to show hidden files by changing the settings in the Folder Options screen. There are two primary ways you can reach the Folder Options screen. Start by closing down all open applications.
Windows 8 and 8.1 users can also refer to our How to View Hidden Files and Folders In Windows 8 & 8.1 article
Method 1: Reaching the Folder Options screen from Windows Explorer
Click on the Windows Explorer icon in the TaskBar at the bottom left hand side of your Desktop:
 Figure 1. Icons in the Windows Panel
When the Explorer window opens, you have to click on the Organize button to display a drop down menu:
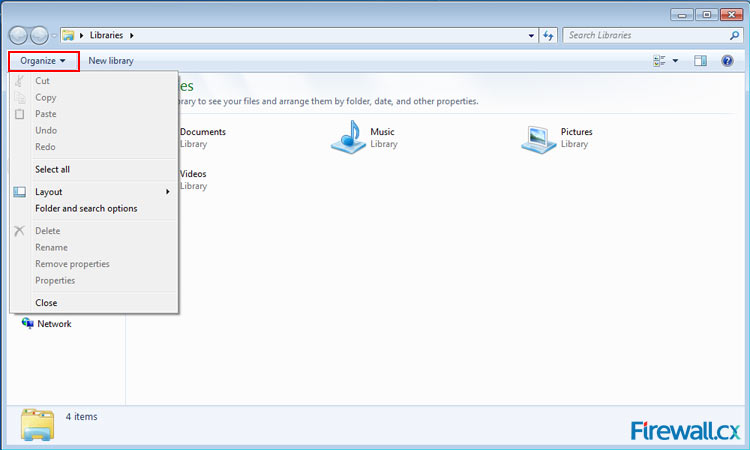 Figure 2. Organize Menu
Next, Click on the Folder and Search options and the Folder Options screen opens up:
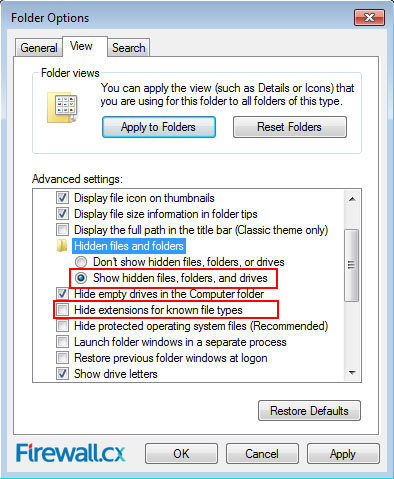 Figure 3. Show hidden files, folders and drives & Hide extensions for known file types
In the Folder Options screen, click on the View tab, go to the Hidden files and folders option and click on the radio button under it labeled as Show hidden files, folders and drives. This will change all the invisible files and folders and make them visible.
It is important to note the Hide extension to know a file type option - normally, Windows keeps this hidden. While still in the Folder Options screen, go to the label Hide extensions for known file types and click to remove the checkmark against it as shown in the above screenshot. This will force Windows to show all extension types for all files.
When ready, click on the Apply and OK button to save the changes.
Method 2: Reaching the Folder Options screen from the Control Panel
Click on the Start icon in the Panel at the bottom left hand side of your Desktop – see figure 4 below. In the resulting Start menu, you must click on the Control Panel option.
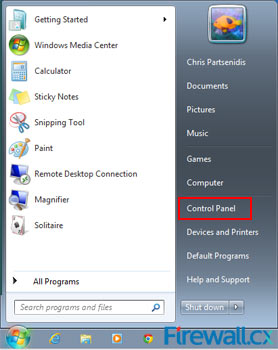 Figure 4. Start Menu
This opens up the Control Panel screen, which allows you to control your computer's settings. Click on the Appearance and Personalization link to open up the Appearance and Personalization screen.
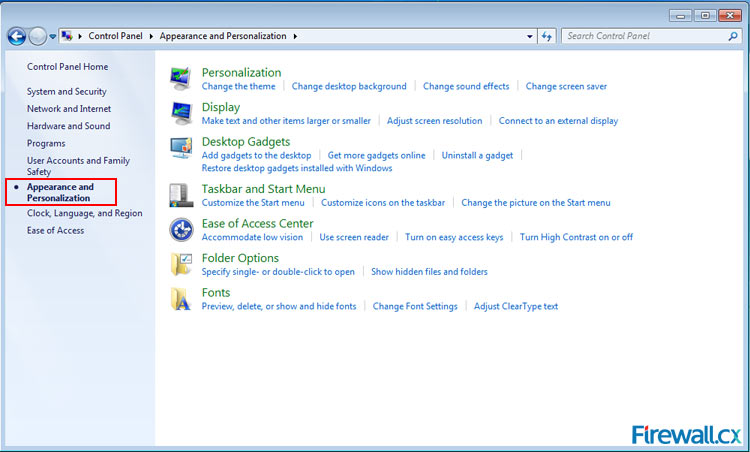 Figure 5. Appearance and Personalization screen
Click on either Folder Options or Show hidden files and folders on the left window, to reach the Folder Options screen.
There are other ways as well to reach the Folder Options screen.
 Figure 6. Show hidden files, folders and drives & Hide extensions for known file types
In the Folder Options screen, click on the View tab, go to the Hidden files and folders option and click on the radio button under it labeled as Show hidden files, folders and drives. This will change all the invisible files and folders and make them visible.
It is important to note the Hide extension to know a file type option - normally, Windows keeps this hidden. While still in the Folder Options screen, go to the label Hide extensions for known file types and click to remove the checkmark against it as shown in the above screenshot. This will force Windows to show all extension types for all files.
Windows also hides files belonging to the operating system. To make these visible, click and uncheck the label Hide protected operating system files (Recommended). At this time, Windows will warn you about displaying protected system files and ask you whether you are sure about displaying them – Click on the Yes button.
When ready, click on the Apply and OK button to save the changes.
Windows Now Shows Hidden Files and Folders
When we next browse through C: Drive, we'll notice that there are now additional folders and files which were previously hidden:
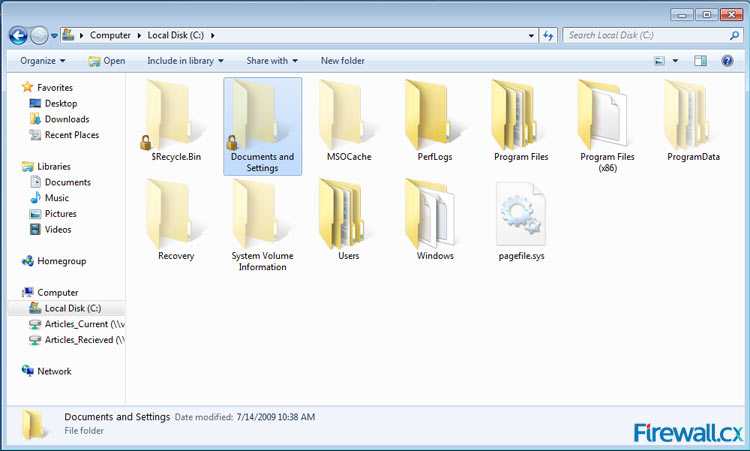 Figure 7. C: Drive showing hidden folders
The folders with the semi-transparent icons are the hidden folders, while those with fully opaque icons are the regular ones.
If you do not want Windows 7 to show hidden files and folders, follow the reverse procedure executed in the Folder Options screen.
Back to Windows XP/Vista/7 Section
How to Unhide a Folder on Windows 7
Source: https://www.firewall.cx/microsoft-knowledgebase/windows-xp-7-8/1067-windows-7-show-hidden-files.html